Product Review: ELF Long-Lasting Lustrous Eyeshadows

S1020164 S1020167 - Copy

Hey Everyone,

Just a really quick review for you today as ELF has FINALLY arrived in Australia. I picked up the first colour Soiree up at Kmart for $8 and then Toast and Gala from iHerb on sale for $3 each.

Let me say that I love these and I am so happy they are in my life. They have an unusually dense, almost bouncy mousse like texture a nice colour range. I will say that the colour is very sheer but I love them for the amount of shimmer and glitter they have in them. So I will jump straight in to colour reviews.

 (3)

Soiree:

A dark pink/plum colour with a lot of pink silver and gold glitter in it. I love to use this over a dark black smokey eye as the colour really picks up and looks gorgeous.

.…………………………………………………………………………………………………………………………………

(2)

Gala:

This is a beautiful cool toned dark brown with purple, red, silver and gold shimmer and glitter particles shot through it. I love to pat this over a bold brown smokey eye to really liven up the look and it is stunning!

……………………………………………………………………………………………………………………………………..

 (4)

Toast:

Probably my favourite because it is the most versatile and neutral one I have. It is a gorgeous gold colour with gold shimmer running through it. I love this one when I don’t want to spend much time on my makeup when I’m going out, I just put a sheer wash of this all over the eyelid with a bold winged eyeliner and a dark red lip and then I am good to go. Below is a photo of it pushed over the eyelid with nothing underneath.

……………………………………………………………………………………………………………………………………

S10201613

So I do love these, I would say I most often use them to finish off a night time eye look instead of by themselves as they are so glittery and sheer. It does set so it isn’t like other cream eyeshadows that move all over your face but in saying that the shimmer/glitter does move around on my eyelid which isn’t a biggie but something that does annoy me slightly. Also another downside to this product is that the name aren’t written on the actual containers. I do highly recommend these though, do you have any? If so which is your favourite?

Talk to you all soon

xx Amelia and Carla

Perfume Masterclass

Perfume and Macaroons

We build our wardrobes to fit different seasons and occasions, so why not our fragrance portfolio? When it comes to developing your own style and fashion, your fragrance is your ultimate accessory.

This week I was lucky enough to join five other ladies in a Pefume Masterclass at David Jones taught by the ever-so stylish and wise Lucy Borland, the National Training Director of Agence de Parfum. Lucy walked us through the basics of attempting to find what style of fragrance would best suit us as well as providing some insight into why it is we adore our favourite perfumes so much.

Fragrance sticks

Ever smelt a perfume on a friend and adored it, only to detest it when you try it on yourself? There are many factors that effect how a perfume will wear on you; namely diet, hormones and the natural acid levels in your skin. We are all individuals, we have different taste in fashion, food, wine and music so why not perfume? Lucy showed us the Michael Edwards fragrance wheel, which colourfully describes that there are roughly four categories for perfume fragrance (Oriental, Floral, Woody and Fresh) and within those four there are further sub-categories. Majority of us will have a natural inclination towards one of these categories, and you should attempt to build your fragrance portfolio from there.

Perfume Image

One of my favourite fragrance brands is Creed. The first fragrance by  Creed was made in 1781 for King George III. To this day, Creed is one of the most successful fragrance brands in the world. They design perfumes for specific people, eg. Lady Di and Audrey Hepburn, that can only be released to the public 5 years after their death, and only with permission from the family. The perfume to the left ‘Spring Flower’ was commissioned for Audrey Hepburn and is one of the most gorgeous bottles I’ve ever seen in my life. Creed has an extremely extensive collection and is worth a look if you are ever at a DJs near you. For further information on the history of the perfumes and the brand click here: http://www.creedboutique.com/

One of the most important things I took from the masterclass was where exactly to spray perfume. I knew neck, and wrists, but in fact one of the best places to spray your perfume is the back of your neck. There it holds for the longest period of time and gives you that ‘wrap around’ feeling of the lingering fragrance. Other good locations include all pulse points like the back of your knees, elbows and wrists. Lucy also recommended that spraying your perfume on warm skin straight after a shower will help with having a longer wear.

If anyone is interested in learning more about fragrance and how to find the best scents for you, Lucy will be running more of these Perfume Masterclasses, comment below for details of the most upcoming masterclass so the information is up to date each time you ask. I had the best time and I would highly recommend it.

Perfume Masterclass

food

Let us know where you think you sit in the wheel. Hope you enjoyed this post and maybe see you at a Fragrance Masterclass soon.

-Rubenesque xoxo

Review: Maybelline Color Tattoos

Photo 12-02-14 10 42 47 AM Photo 12-02-14 10 42 30 AM Photo 12-02-14 10 41 47 AM Photo 12-02-14 10 41 06 AM Photo 12-02-14 10 41 21 AM Photo 12-02-14 10 42 09 AM Photo 12-02-14 10 39 45 AM Photo 12-02-14 10 40 24 AM

Hello lovelies!

Today I want to share my (embarrassing) obsession with the Maybelline Color Tattoos. I freaking love these things, I have very oily eyelids and the Color Tattoos are my saviour. Although I like the UDPP and the Two Faced Shadow Insurance primers they just don’t work as well as a product that sets, in my opinion at least.  I use these beauties almost everyday alone or underneath eyeshadows.  When I am going out or having a formal event to attend I can guarantee that I have one of these on. So lets jump into swatches and individual colour reviews!

Tough as Taupe– this is the first colour I ever bought so it has as special place in my heart and I adore it. This is not as creamy as the Barely Branded shade but I would definitely not call it dry. I have smaller eyes so when I want to do a dark, dark smokey eye I don’t like to use blacks because it can make my eyes look even smaller so I use this colour! I put this all around the eye, then I grab a similar colour and really blend it out, lots of mascara and flawless skin perfects this look.

Photo 12-02-14 10 41 06 AM Photo 12-02-14 10 47 38 AM - Copy (2)

Inked in Pink– I would have to say this is my favourite shade. It is a great metallic baby doll pink that makes my green eyes look greener without an in-your-face colour. It is very wearable and perfect for everyday. I love to wear this shade by itself with heaps of mascara, rosy cheeks and bright berry lip

Photo 12-02-14 10 41 47 AM Photo 12-02-14 10 47 38 AM - Copy (3)

Painted purple– Now I have to say that I am a little disappointed with this colour, I thought it was going to be brilliant but it is very sheer. Don’t get me wrong it is still a lovely colour and has a great consistency but I would have preferred an opaque formula.

Photo 12-02-14 10 42 47 AMPhoto 12-02-14 10 47 38 AM - Copy (4)

Bad to the Bronze–  I did not get this colour for sooooo long and Carla kept telling me to get but I thought it just looked boring but there was a sale, one thing lead to another and this baby ended up in my collection. I am so glad it did! It is a mid toned bronze colour with quite a lot of shimmer shot through. This is so perfect by itself but I reckon it would be great smoked out with a darker brown for an evening look.

Photo 12-02-14 10 42 30 AM Photo 12-02-14 10 47 38 AM - Copy (5)

Barely Branded– a staple in anyone’s collection whether it be this product or something similar. It is a beautiful opaque champagne colour that is extremely creamy and is perfect for an eyeshadow base. I also wear it alone with a tonne of mascara for a great everyday look or as an inner corner highlight

Photo 12-02-14 10 42 09 AM Photo 12-02-14 10 47 38 AM - Copy (6)

Pomegranate Punk– A great deep red/purple/burgundy colour. I would highly recommend this colour for blue and green eyes as it will make them look so much brighter. Again it has a very creamy consistency and I love to use this as an eyeliner and as a great smokey eye colour.

Photo 12-02-14 10 41 21 AM Photo 12-02-14 10 47 38 AM - Copy (7)

Bold Gold– a gorgeous almost olive gold with fine glitter particles throughout. I love this by itself or another favourite look is to smoke it out with a dark purple and push some gold glitter over the whole lid, perfect modern smokey great for any formal occasion. I have to say though this Color Tattoo is slightly drier than some of the others, probably due to the glitter particles.

Photo 12-02-14 10 40 24 AM Photo 12-02-14 10 47 38 AM - Copy

Electric blue– Okay this colour is a perfect smokey eye base but my favourite way to use it is as an eyeliner! Because these cream shadows do set they can be used as an eyeliner and I love it, I wear a thin line for a more day look and I have worn it out as a graphic eyeliner and it looks fabulous!

Photo 12-02-14 10 39 45 AMPhoto 12-02-14 10 47 38 AM - Copy (8)

They boast a 24hr wear and although I can’t confirm this, as the longest I have worn them is 16hrs, I can confirm that after 16hrs they are just as vibrant as when you first put them on and show no sign of moving. For Victorians they are almost always on sale (or part of a deal) at Chemist Warehouse, I got mine for between $5-$8 each which beats the full price of $15.

So final verdict? I love them! They do not budge, they are super creamy, easy to apply, opaque, and will last you all day and all night. The colour range is fabulous and can be worn for everyday and evening looks, although I think they are missing a dark green and a dark purple, then it would be complete. Like a said before I wear these under eye shadows, alone and as eyeliner.

Tell me your favourites!

Hope you enjoyed

xxx

Amelia and Carla

Makeup of the Day! (with links for all products)

Processed with VSCOcam with g3 preset(Images of final look below)

Tropicoral set – http://www.sephora.com/go-tropicoral-lip-cheek-kit-P375251

Dallas – http://www.benefitcosmetics.com/product/view/dallas

Gimme Brow – http://www.benefitcosmetics.com/product/view/gimme-brow

Volume de Chanel – http://www.chanel.com/en_AU/fragrance-beauty/Makeup-Mascara-LE-VOLUME-DE-CHANEL-147260 (full review here https://rubenesquebeautyblog.wordpress.com/2013/07/05/battle-of-the-mascaras/)

Bobbi Brown BB Cream (SPF35) – http://www.bobbibrown.com.au/products/9447/Makeup/Face/BB-Cream/index.tmpl?cm_sp=Gnav-_-Makeup-_-Face-BBCream#

Revlon Colourburst (027 ‘Juicy Papaya’) -http://www.priceline.com.au/cosmetics/lips/lipstick/colorburst-lip-butter-2.55-g1

Pleats Please (Issey Miyake) – http://www.isseymiyake.com/en/brands/pleats_please.html

M.A.C. Powder Blush (Sprinsheen) – http://www.maccosmetics.com.au/products/spp/shaded.tmpl?CATEGORY_ID=CAT156&PRODUCT_ID=PROD329&SKU_ID=SKU3766

Processed with VSCOcam with c1 preset Processed with VSCOcam with c1 preset

Hope this has helped you find some of the products you’ve been searching for. Would love to hear from you to find out about any new products (especially in the coral range)! If you like any of these images, we do #motd posts all the time on our instagram and would love if you could check us out @rubenesquebeautyblog, hit us up with a comment so we can find you too!

Thanks,

-Rubenesque xoxo

HOW TO: Graphic Eyeliner

S1020050 S1020025 S1020055 S1020047

With the big lead up to the Virgin Australia Melbourne Fashion Festival in March we thought we would bring you another on trend look inspired by the looks from the ss14 fashion weeks and from the recent #VAMFF makeup trials. Drum roll please (even though the title gave it away)……. GRAPHIC EYELINER!

This is a trend that has been on the catwalk for years and years but we thought we could show you a completely goof proof way of achieving this super fierce eyeliner look.

Step 1: Remove all traces of makeup and apply a trusted eyeshadow base. We recommend Two Faced Shadow Insurance or a MAC paint pot

S1020004

Step 2: Sticky Tape! With this you need to put the piece of tape on your hand to remove most of the stickiness and then place it on the outer part of the eye. You need to make sure the edge of the tape follows the imaginary line that connects your nostril to the corner of your eye. And please try to place the tape under your bottom lashes.

Step 3: choose your eyeliner! I used a gel eyeliner but I think it would have been better to use a liquid so you can get a more precise line.

………………………………………………………………………………………………….

S1020007Step 4: Now armed with your eyeliner, start with a super dramatic flick and note that you do not have to be even a little bit neat as the tape is your lifesaver.

……………………………………………………………………………………………………

S1020008

Step 5: Draw a thin-ish line across the top lashline

…………………………………………………………………………………………………….

S1020010Step 6: Build up the line so most of your eyelid is covered by the eyeliner, then clean up the line so it is nice and smooth. (If you are having difficulties with this we would recommend the Simple Makeup Corrector Pen or a fine brush dipped in makeup remover.)

…………………………………………………………………………………………………..

S1020012Step 7: The most exciting part! Remove the sticky tape and voila, you have a crisp perfect line. Add mascara and you’re done!

…………………………………………………………………………………………………

(All the steps from here on are optional)

Step 8: Apply eyeliner to your inner rims and waterline

Step 9: Smudge a dark eyeshadow close to your lashline for a smokey-er effect and to minimise the appearance of smaller eyes.

S1020047 S1020050S1020025S1020055


That’s all! We hope you liked it! I have worn this eyeliner out a few times and I love to mix up the colours, I have worn navy, dark green and dark purple graphic eyeliner looks before. I would recommend pairing this bold eye with a ponytail, contoured cheeks and a nude glossy lip. If you are looking for a budge proof liquid eyeliner I would suggest checking out the Kiss Me Heroine Liquid Eyeliner, I have been using this product for three years now and I swear by it.

If you have any questions, recommendations or requests please leave them down below.

Have a lovely day!

Love from Amelia and Carla

Fall and Winter Recommendations!

Image

So we are well into Spring here in Australia, but I felt that I couldn’t leave Winter behind without sharing with the rest of you my favourites from the season. So let’s get straight into it!

Lips:

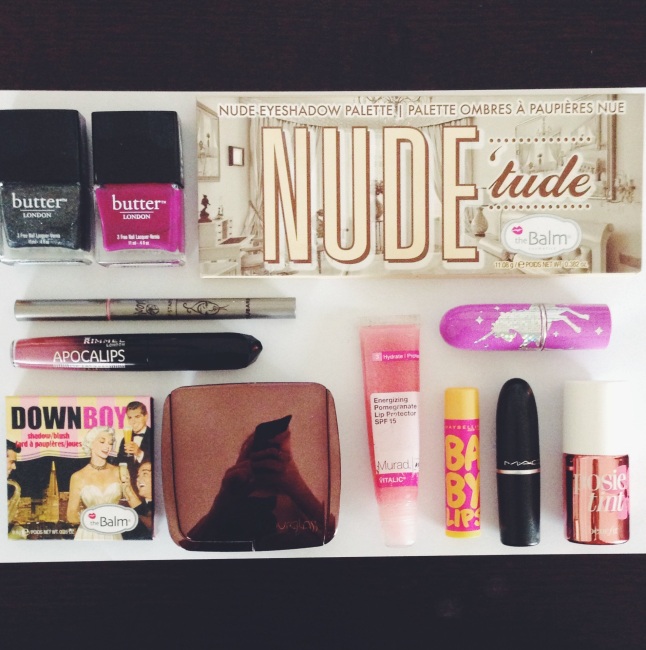
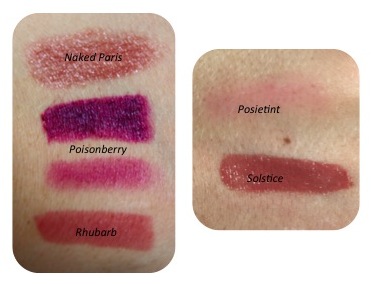
We all know that the colder seasons are perfect for those grungy-vampy dark lips, but one of my more favourite shades for the past winter was ‘Naked Paris’ by M.A.C. It is a really subtle shimmery-nude colour, with just enough darkness to grunge up your look a little. Lipstick Swatches

Another favourite was ‘Poisonberry’ by Lime Crime. This is a vibrant but dark purple at its full pigmentation. In most online swatches you’ll see it as a gorgeous dark sheen of purple, however, for an everyday look I tended to pat it onto my lips to a pigmentation that I was comfortable with. I’ll swatch it for you at both pigmentation levels so just check the images to the side.

I get really into stains in Winter too, because I’m always putting lip balm on to avoid chapped lips. Stains are a great way to keep some colour while continuously applying the balms that we so desperately need in the cold. Two of my favourite stains are ‘Rhubarb’ by Bloom Cosmetics and ‘Posietint’ by Benefit Cosmetics. Where Rhubard is a definite dark vampy shade, posietint can be used on both the lips or the cheeks to give a natural flushed look which can be really flattering in the colder seasons.

And last but not least the lip product that took the makeup world by storm last season ‘Solstice 201′ from the Apocalips series by Rimmel London! These gorgeous liquid lipsticks are so incredible, sit so well on the lips, give great pigmentation and have a cute colour range for most seasons. Well worth a look in the coming seasons *fingers crossed they release some more shades*

Eyes:

IMG_5215

This fall and winter I didn’t really discover many new eye products that I liked in terms of eyeliner or mascara but as far as eyeshadow goes, I found myself coming back to the same palette most days. The Nude ‘tude palette by theBalm has so many fantastic neutrals with enough warm, dark shades to really grunge up your look for Winter. As far as selling it to you further, I really feel that this palette speaks for itself so check out the images.

Cheeks:

theBalm really stood out to me in the last season, with their blush ‘Down Boy’ being another favourite. (though I really feel that it is a great shade for any season)

As a highlight and finishing powder for the under-eye area I found myself wearing Hourglass’ Ambient lighting powder in ‘Diffused Light’ it is a stunning (yet ridiculously expensive) powder with just enough shimmer in it that it really lights up your face without making you feel like you are covered in glitter.

Nails:

I have really been getting into Butter London nail polishes in the last year. They always have great pigmentation, great lasting power and not too long a drying period so as you can imagine, I use them all the time. My two favourite shades for Fall and Winter would be ‘Queen Vic’ and ‘Gobsmacked’. I would highly recommend most of the glitter polishes from Butter London as they dry ridiculously fast which is always a bonus, and look so cute!

July Favourites!

So for our very first ‘Monthly Favourites’ we decided to make a youtube video. Hope you all enjoy!

Some featured brands include theBalm, Maybelline, Rimmel, Chanel, Tony Moly, Benefit and Eyeko!

Would really appreciate it if you could subscribe or check out our other videos. If you also have a youtube please comment with the link, we’d love to check out your videos too!
One of the best things about the beauty community on wordpress is that everyone is really supportive of each other. Would be amazing to spread the love ❤


Basic Contouring and Highlighting

Contouring and highlighting is a great way to visually minimise and enhance facial features. This is one of the most difficult makeup techniques to master as it is very obvious when it goes wrong. So why would you contour and highlight in the first place? Well it an can make your face look thinner, cheek bones more prominent, and nose slimmer.

Products

There are many different products you can use to contour. For a more natural look (and my personal favourite) you can use two different shades of foundation: one a shade lighter than your skin colour and one a shade darker. You can use powders, a matte cool toned brown and a light powder with fine shimmer particles. If using a powder highlighter make sure it is not glittery or has large particles of shimmer or has a metallic finish if you want to keep it fairly natural. The final way is to use liquids or creams, this often has the most natural finish as the skin is naturally dewy and creams give the same finish. Although I love this option is is usually not the best for people who have oily skin that are looking for longevity with their makeup.

Our favourite products are: NYX blush in Taupe, Sleek contouring and highlighting palette in Light, Benefit liquid highlighter in High Beam, MAC mineral skin finish in Soft and Gentle, Benefit Hoola and Chanel Soleil Tan de Chanel

Concepts

Once you get the general concepts of contouring then it can be applied to any face and you can decide how much or little you want to visually alter your face shape. So what are these basic concepts?

– if you apply a dark matte colour to any part of your face you are going to make that part less prominent and it appears to be further back or minimises the area. Make sure the colour is matte as a shimmery colour does the exact opposite of what you are trying to achieve

– if you apply a light shimmery colour to any part of your face you are going to make that part more prominent and it appears to be further forward or enhances the area . A shimmery colour reflects the light which enhances the effect of the highlighter.

Tools:

It really depends on whether you are using a powder or a liquid. For powders I would recommend a small kabuki brush for contour and a small fluffy brush for highlighting (something like a MAC 224). For liquids and creams I would recommend a pointed dense synthetic brush (like the Real Techniques contour brush) for the contour colour and for the highlighter I would recommend a small synthetic fluffy brush (like the Sigma P82). The reason I would suggest synthetic brushes for liquid or cream products is that the bristles are not damaged by the product and real hair brushes sometimes are and they are more likely to leave the product patchy on your face.

Application

Now keeping all of that in mind where should you apply it? Well the most feminine features on the face are our high cheekbones, slender nose and small foreheads, so that is where we want to place our contour and highlighter.

Cheekbones: place a contour colour under where your cheekbones are, the easiest way to find this if you’re a beginner is to pull a fishy face and place the colour in the hollow that starts at the top of your eye and goes to the corner of your mouth. It is important to not apply the contour all the way to your mouth but instead stop where your eye starts. For highlighter you apply it on the top of the cheekbones and blend it towards the hairline. Again don’t apply the highlighter to close to the nose but instead start the highlighter  at the otter edge of your iris and bring it up to the hairline. (Brown is contour, pink is highlighter)

1069102_10201643032661612_1900031074_n

Nose: place the contour colour on the edges of the nose and keep the bridge of the nose free of product, make sure you use a very light hand. With the highlight colour place down the bridge of the nose but stop it before the nostrils as it will just make the nose look oily if product is placed in that area. (Brown is contour, pink is highlighter)

1080880_10201643032541609_714692232_n

Forehead: this technique is often used when wanting to bronze up the appearance of your face but can also be used to further shape the face. Using the contour colour place it on the  temples and sides of the forehead and leave the central part free of product. You can also place highlighter in this central region but I would not recommend this as I believe it looks quite unnatural when placed in this area.

1075138_10201643032621611_50279716_n

Let us know how this works for you and any of your contouring and highlighting techniques

xxx Rubenesque

Battle of the Mascaras

Mascara

Recently we went to Chanel to purchase the illustrious Vitalumière Aqua foundation. When we were there the shop assistant gave both of us samples of their new mascara: Le Volume de Chanel. So we thought we’d try it out and do a review to compare it to the drugstore mascaras of our current collection and decide if the High-end brands are really worth the hype.

High End makeup brands…we all want them in our collection, don’t lie ladies. The packaging, the colour range, the hype; we are all very easily sucked in. Unfortunately, purchasing these items puts a serious dent in our savings. But often you are paying for quality, so it’s worth it. But don’t be fooled! Many of these products are not worth the hype, and often there are products from cheaper brands that produce really similar results.

It is worth doing your research before making such expensive purchases. Good sources for easy research include youtube and beauty blogs.

Today we are endeavoring to compare a couple of high-end mascaras with some of our favourite drugstore mascaras.

Covergirl Lash Perfection Mascara 

Advertised as a volumising mascara that gives a ‘dramatic look’ with a brush that attempts to coat each lash individually. From personal experience it does have really great separation of the lashes that gives a quite natural, volumising look. No clumps, and lasts on the eyes all day. I wouldn’t say that it’s that ‘dramatic’ in its volume but it’s great for a slightly voluminous, natural looking lashes. We give this mascara 8/10.

Maybelline Define-a-lash (waterproof formula)

This is NOT WATERPROOF! Both of us will testify that we initially really liked this mascara, but the formula changed and since then we just haven’t been as happy. Also, unlike the advertising, it is not waterproof and smudges when wet, however, is still ridiculously hard to wash off your eyes at the end of the day. Nevertheless there are positives to this mascara. It provides great length and definition whilst minimally enhancing volume so gives a fairly natural look. It advertises as a mascara that ‘elongates and accentuates the lashes’ so overall it almost lives up to expectations. We give this mascara 6.5/10.

Maybelline The Falsies Flared

1059316_10201526284542982_677321974_n

A mascara that has a pro-keratin formula, in my personal opinion it doesn’t visually make a difference but may be better for your lashes as keratin is a main component in hair. The falsies is one of my favourite, it is extremely thickening and lengthening, it does give you great looking lashes but I still wouldn’t go as far to say that they look like falsies. I do love the thick curved wand, it is really great  at curling the eyelashes and the formula does hold the curl a pretty well. The formula is quite thin and wet but the bristles tend to dry out the product quickly. The only bad thing I have to say about this mascara is its longevity, after only a few hours it starts to mildly flake off, it isn’t a deal breaker but just a slight annoyance. We give this mascara 9/10. 

Revlon Grow Lucious Mascara 

1062596_10201526284422979_1198861355_n

Okay so this is a mascara that I really love, what I look for most in a mascara is longevity. And this mascara lasts perfectly, there is no smudging or flaking as long as you don’t get wet. The large brush claims to plump and visibly lengthens lashes and I have to say I agree. The brush is very large which I like but I know many people hate them, so I guess this mascara may not be for those people. It has a wet think formula that lengthens the lashes but I would say it doesn’t give much volume to them, I like the formula though as it is easy to apply and dries quickly. As for the claims that it helps to grow your lashes, I don’t think that it has done anything to my natural lashes, however I didn’t buy this mascara with the hopes that it would work so there wasn’t any disappointment from me. This mascara is a good drugstore version of my holy-grail one. We give this mascara 9.5/10.

Covergirl lash blast length 

1058954_10201526284382978_1565366751_n

This mascara gives great length and beautiful separated lashes but basically no volume giving the overall effect on the lashes a nice natural look. I love this mascara for everyday when you don’t really feel like wearing makeup. It is buildable and you can  get a little more volume if you want that sort of look. It claims to be water-resistant which I haven’t yet fully tested, but I have never had an issue with smudging or flaking. We give this mascara 8/10.

Le Volume de Chanel (10 noir)

Advertises as a mascara that provides ‘volume and curl – lash by lash’. And it definitely delivered! It is incredibly light weight, so doesn’t weigh down the lashes over the day. Lasts all day and looks exactly as you applied it in the morning! Gorgeous deep black colour with amazing separation of the lashes that gives you such an incredible volumising and lengthening look. We honestly couldn’t believe how amazing our lashes looked with it on.

We give this mascara 11/10!

They’re Real Benefit

Probably one of the best mascaras on the market at the moment. And yes, you have probably seen about 1 million reviews on this already. With good reason. It really lives up to it’s name with about 95% of people who try it. It advertises that it ‘lengthens, curls, volumizes, lifts and separates’ and it really does all that! And on top of all that it has great long lasting results! The brush is also fantastic in that it allows you to get into those small lashes closer to your nose that sometimes get left behind. The formula lasts all day and doesn’t weigh your lashes down at all. Unfortunately, although it is not as expensive as some of the other mascaras that are considered ‘high end’ it still costs a pretty penny. We  give this mascara 9/10.

Dior Extase

1062022_10201526286863040_1676604421_n

This is a great mascara, it has one of those wavy wands that look like three balls have been stuck together. I am a big fan of these wands but I know it is personal preference because Carla hates them. These wands give your eyelashes a super curled effect and make your lashes look fantastic. There are a few downsides however, the formula dries up quickly, it is a dark grey instead of black (like advertised) and it weighs down your eyelashes which means after a couple of hours you have already lost the brilliant curl that the mascara wand just gave you. The mascara really does give you great looking lashes, it lengthens and gives great volume  We give this mascara 6/10.

Lancome Virtuose 

1060828_10201526284182973_713831533_n

One of our higher end mascaras Lancome Virtuose was one of the first wands to have this curved shape when brands like Maybelline (with the falsies flared) caught onto the trend. I do love this mascara but for the $30 price tag I’d rather go with the falsies flared as the formula is almost identical. The only reason I would go over this over the falsies is because of the wand, it grabs every single lash (even those little ones still growing) and lengthens, separates and gives amazing volume. I would love to try out the Hypnose version of this one as I tend to like the wavy wands more. We give this mascara 9/10. 

Just remember that everyone has a different eye shape and different preferences so we can’t guarantee our experiences will be universal. However, we believe the clear winner is…

DRUM ROLL PLEASE!

Le Volume De Chanel!

Considering that mascaras only last 3-4 months and most people won’t want to spend $160 on mascara a year, we believe that the close runner up is Revlon Grow Lucious.

So the final verdict, are high end mascaras worth it? Well in our honest opinion with the short expiry date on most mascaras and the large price tags, luxury mascaras are just that, luxury items. Overall they are better quality mascaras, they make your lashes look incredible and generally last longer than drug store ones, but for three to four times the price it just isn’t worth it on a day to day basis. Besides drug store brands over the past year have really picked up their game and the quality has skyrocketed. Don’t get us wrong, high end brands and their mascaras are amazing and if you feel like a spluge the price definitely reflects the quality, we recommend them for special occasions and days where you feel like an extra kick with your look.

Hope you enjoyed

xxx Rubenesque

(PS. If you have any questions regarding specific use, retail price, or anything else, feel free to comment below and we will reply as best we can)